CPU内存、缓存、缓存行
¶缓存及内存的结构


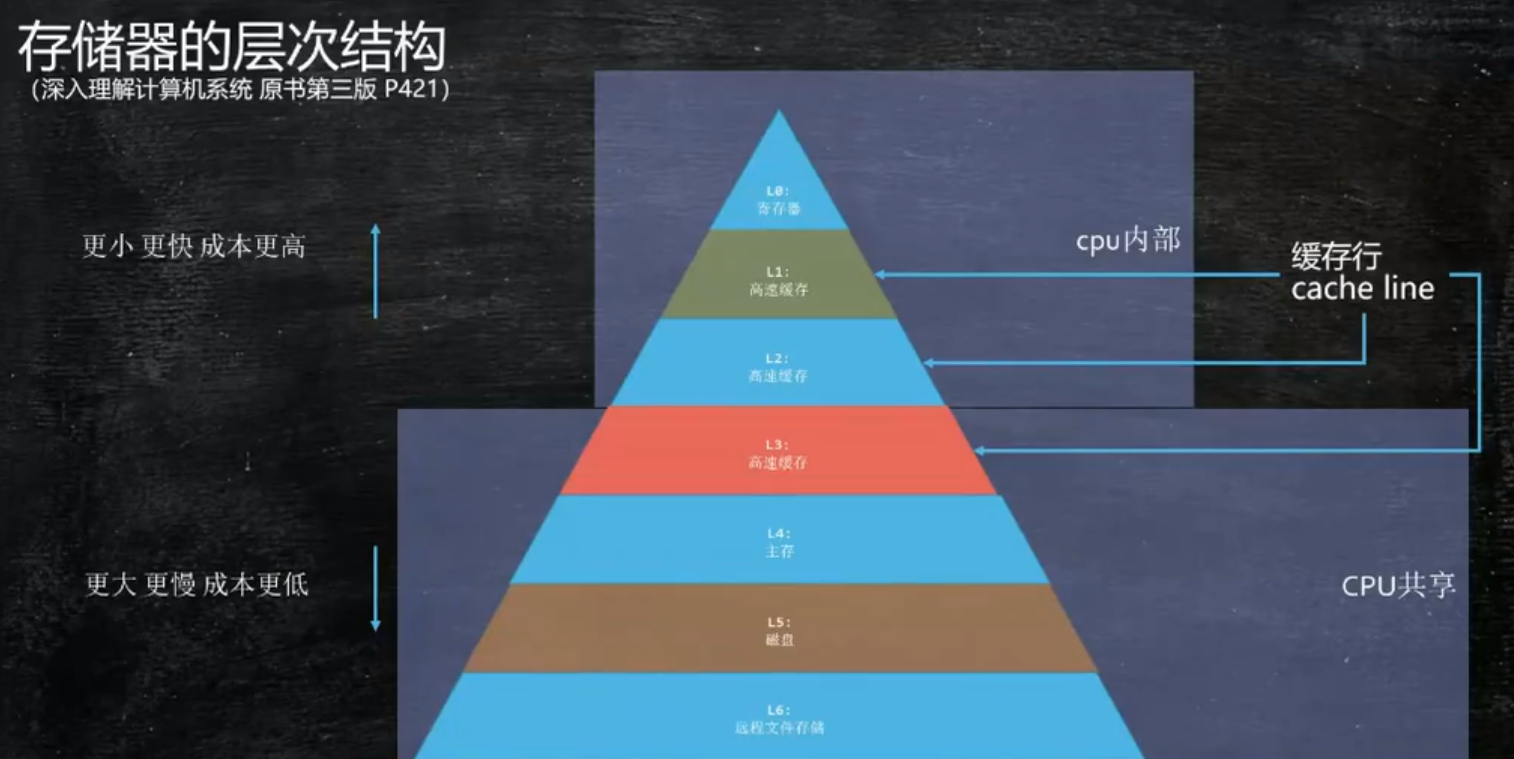
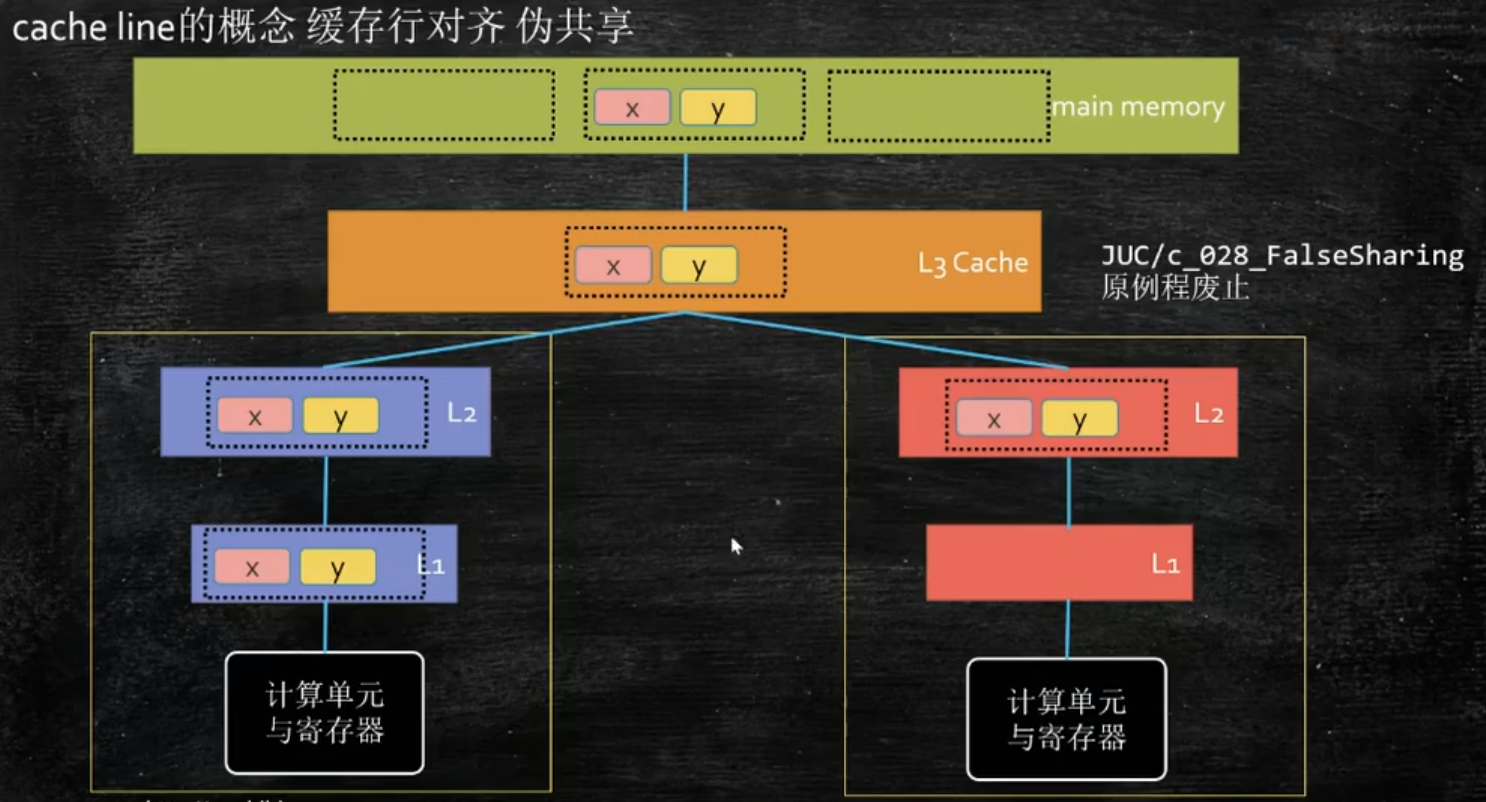
寄存器获取数据首先从L1缓存里去找,没有则找L2, L3, 主存,一级一级往下找。多核CPU中每个核都有自己的L1, L2缓存,一个CPU中的多个核共享一个L3缓存
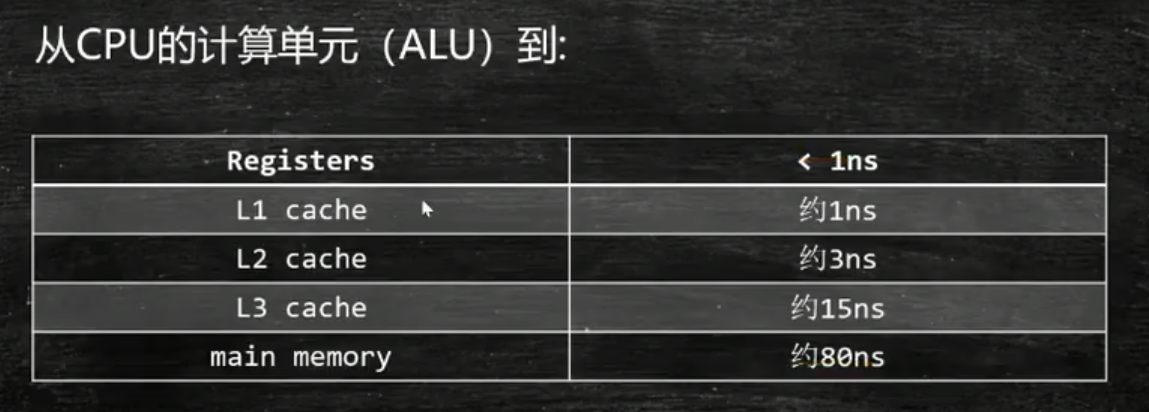
CPU计算单元到各级缓存所用时间:

¶读取逻辑
¶按块读取
由于时间局部性原理和空间局部性原理,每一次从内存中拿数据最好成块读取,提高效率,充分发挥总线CPU针脚等一次性读取更多数据的能力
缓存行:
缓存行越大,局部性空间效率高,但读取时间慢,目前根据工业实践取了一个折中值64byte

¶演示缓存行的实际效果:
False Sharing 伪共享及其编程实现:
public class T1_CacheLinePadding {
    public static long COUNT = 1_0000_0000L;
    public static T[] arr = new T[2];

    static {
        arr[0] = new T();
        arr[1] = new T();
    }

    public static void main(String[] args) throws InterruptedException {
        CountDownLatch latch = new CountDownLatch(2);
        Thread t1 = new Thread(() -> {
            //修改1亿次
            for (int i = 0; i < COUNT; i++) {
                arr[0].x = i;
            }

            latch.countDown();
        });
        Thread t2 = new Thread(() -> {
            //修改1亿次
            for (int i = 0; i < COUNT; i++) {
                arr[1].x = i;
            }

            latch.countDown();
        });

        final long start = System.nanoTime();
        t1.start();
        t2.start();
        latch.await();
        System.out.println((System.nanoTime() - start)/100_0000);    //2834
    }

    static class T{
        public volatile long x = 0L; //long: 8byte
    }
}
public class T2_CacheLinePadding {
    public static long COUNT = 1_0000_0000L;
    public static T[] arr = new T[2];

    static {
        arr[0] = new T();
        arr[1] = new T();
    }

    public static void main(String[] args) throws InterruptedException {
        CountDownLatch latch = new CountDownLatch(2);
        Thread t1 = new Thread(() -> {
            //修改1亿次
            for (int i = 0; i < COUNT; i++) {
                arr[0].x = i;
            }

            latch.countDown();
        });
        Thread t2 = new Thread(() -> {
            //修改1亿次
            for (int i = 0; i < COUNT+1; i++) {
                arr[1].x = i;
            }

            latch.countDown();
        });

        final long start = System.nanoTime();
        t1.start();
        t2.start();
        latch.await();
        System.out.println((System.nanoTime() - start)/100_0000);    //964
        System.out.println(arr[0].x);
        System.out.println(arr[1].x);
    }

    static class T{
        public long p1,p2,p3,p4,p5,p6,p7;
        public volatile long x = 0L; //long: 8byte
        public long p9,p10,p11,p12,p13,p14,p15;
    }
}
可以看到,测试程序T1的运行速度是T2的好几倍,T2多声明了几个无用的成员变量后执行速度反而快了,为什么?
- 对于T1,一个long变量x只占了8byte,所以 arr[0].x 和 arr[1].x 紧挨着,多核CPU不同核上运行着不同线程,同时取出它们所在的缓存行,每次修改后,为了保持缓存行的一致性,都要通知另一个CPU核(它们改的不是同一个变量,只是所修改的变量恰巧在同一块中),造成了大的开销。
- 加多几个冗余变量,这样两个线程所操作的变量x分别在不同的缓存行中,省去了相互通知的开销,所以执行时间更快。
¶缓存一致性协议
(在Intel芯片上的实现,叫做MESI)

该协议只是两CPU核在硬件层级做数据一致性的一种实现协议
转载请注明来源,欢迎对文章中的引用来源进行考证,欢迎指出任何有错误或不够清晰的表达,邮件至 708801794@qq.com
文章标题:CPU内存、缓存、缓存行
文章字数:712
本文作者:梅罢葛
发布时间:2020-09-06, 15:14:34
最后更新:2020-10-28, 15:26:26
原始链接:https://qiurungeng.github.io/2020/09/06/CPU%E5%86%85%E5%AD%98%E3%80%81%E7%BC%93%E5%AD%98%E3%80%81%E7%BC%93%E5%AD%98%E8%A1%8C/
